
Photo Tip: Setting Depth of
Field
The depth of field in an image is crucial to how it looks, and so controlling the depth of field when shooting is crucial in photography. Especially so in nature photography, where technical excellence is expected since there is usually time to thoughtfully set up one's camera controls.
In this Photo Tip I'll explain how to dial in the exact amount of depth of field that you want, but first let me make sure you understand what depth of field is. Depth of field is the distance from the nearest to the farthest point in the image that is in acceptably sharp focus. I say "acceptably sharp" because, technically, only things at the exact distance to which you focused are at their sharpest. Objects closer to the camera and farther from the camera than the focused-at distance are somewhat out of focus and fuzzy. The degree of fuzziness gets worse the farther the object is from the focus distance. Eventually, this fuzziness gets objectionable, and one declares this point to be the limit of the depth of field.
This degradation of sharpness with distance from the point of best focus happens slowly when the lens aperture is stopped way down to a small hole, and happens in a hurry when the aperture is wide open. Thus aperture controls the depth of field: depth of field is small with wide apertures and large with small apertures. This point is one of the most vital in all of photography and bears repeating: aperture controls depth of field.
(Some people get confused by the f-stop labels for aperture: large f-numbers corresponding to small apertures and vice versa seems counterintuitive to them. For them, I suggest remembering that small f-numbers correspond to small depth of field, and vice versa. Maybe this will be more memorable.)
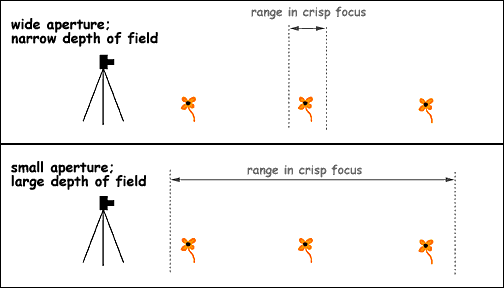
I've illustrated the concept of depth of field in the following sketch. Note that with a large aperture and correspondingly small depth of field, only the middle flower will record sharply on the film; the near and far flowers will be blurry. By stopping down the aperture the photographer can increase the depth of field so that all three flowers register as (acceptably) sharp.
Here is a real-world example. I shot the same scene (well, almost; I changed camera position slightly between the shots) with a large aperture and a small aperture. Same scene, same light, same film, same lens....but one with a narrow depth of field and one with a large depth of field. The two images look very different. You are welcome to prefer either one. I'm not telling you what aesthetic choices to make in your photographs, I'm just passing along the tools you need to execute the choices you make.


Narrow depth of field (left) and large depth of field (right).
The foreground foliage being in or out of focus significantly affects the
look of the photo.
Here are another two real-world examples of the importance of setting
depth of field to what you want it to be. In the image on the left I deliberately
chose a small depth of field to throw the background flowers out of focus,
drawing the viewer's attention only to the foreground flowers. In the image
to the right I wanted everything crisp, near to far. The closest leaves
were only about 18 inches in front of my lens, so I had to be careful and
deliberate in choosing my depth of field to accommodate everything from
18 inches to infinity.

![]()

Narrow depth of field (left) and large depth of field (right).
So you've seen how depth of field affects the look of a photo, you are aware that as the photographer you get to choose the depth of field you want, and you know that aperture is how you control it. Okay then , how do you precisely select your depth of field? I suppose guessing is one way, and with vast experience you might just be able to get away with it. "This scene looks like it needs about f/11." Or you could always go to extremes -- if you want a large depth of field, stop the lens all the way down, and if you want a narrow depth of field, open up all the way. But these approaches are crude, very crude. Somewhat better is to use your camera's depth of field preview feature, if it has one. (A must in a camera for nature photography.) This feature stops the lens down to its shooting aperture so you can see just how the scene will look on film. (Without this feature you are looking through the viewfinder with the lens wide open, no matter what f-stop it's set at.) This depth of field preview is great for telling how fuzzy the fuzzy things will be, but worthless for telling how sharp the sharp things will be -- the visual acuity in the viewfinder just isn't sufficient. Something that looks sharp in the viewfinder may record on film as only kind of sharp, an image immediately bound for the wastebasket.
The most precise way of setting the depth of field to exactly what you want is to use the markings on the lens barrel. Here's how it works.
The first thing to realize is that, when you focus on something through the viewfinder, you can then refer to the lens markings to read the distance to that object. This is shown below. You locate the black dot, identified in the photo by the large arrow, and then simply read off the distance from the distance marking lined up with it. In this example, the lens is focused 1.5 meters away (the white distance markings), or, equivalently, 5 feet away (the yellow distance markings). (The colors of the distance markings may be different on your lenses.) This means your camera can be used to measure distances. (Next time you want to measure a room to see how much paint it will need, you can use this rangefinding feature of your camera. It's not as accurate as a tape measure, but it's easier.)

The camera can measure the distance to the focused-upon object.
Armed with this ability of the camera to measure distances, here is how I set about establishing the exact depth of field I want in an image. I first measure the distance to the nearest point in the image I have composed that I need to be sharply in focus. Let's say this is what I did in the above photo. Then I focus on the farthest point I require to be in focus. This is illustrated in the picture below. In these examples the near and far points that I require in acceptably sharp focus are 1.5 meters (5 feet) and 3 meters (10 feet).

I measure the farthest distance (illustrated here) and the nearest distance
(illustrated above) that I insist be in acceptably sharp focus.
Now I know exactly how much depth of field I need. Then I use the markings on the lens barrel to select the aperture that will give me that depth of field. In the picture below, look at the silver ring that has the black focusing dot. See how there are pairs of color-coded lines on either side of it? I turn the lens focusing ring until I find the pair of lines that will encompass my near and far points. In this example, I've found that the blue lines (pointed out by the arrows) will encompass my near and far points of 1.5 and 3 meters. After turning the focusing ring to line up the blue lines with my near and far points, I leave the focusing ring there. Then I look to see which aperture setting has a color to match the depth of field lines. In this case the blue lines match the blue f/16 marking. So I set the aperture to f/16 and I'm done! I've set the camera up to give me the precise depth of field I want for this image. I go ahead and shoot.

What if my near and far points had been, say, 1.5 and 5 meters instead of 1.5 and 3 meters? Then the blue lines and f/16 wouldn't have provided enough depth of field. I'd have to switch to the orange lines and f/22.
If the near and far points were 1 and 5 meters instead, you can see from the photo that there is no way even the orange (f/22) lines would provide enough depth of field. In this case the laws of optics forbid me from making the image I would like to make. Sometimes you just can't get enough depth of field from your lens. One solution in this case is to recompose your image so the camera is farther away from the objects of interest. Depth of field is most limited for close objects, and gets progressively larger the farther away they are. Another solution is to recompose your image using a wider angle lens. Again, the photo will be different from what you had originally envisioned, but wider angle lenses have larger depths of field at a fixed camera position than longer lenses.
I don't know if you noticed it or not, but I shot without ever taking note of the distance I actually wound up focusing at! It doesn't matter -- if the near point and the far point are sharp, then everything in between is sharper still. I just don't care where the sharpest focus wound up. (In the above photo you can read it off as about 2 meters, but it just doesn't matter.)
You now have heard the method of how to use your lens markings to precisely control your depth of field. (This procedure obviously only works if you have the leisure to execute it. In fast breaking situations you have to revert to less accurate methods.) What do you do if your lens lacks the markings I've been describing? Many zooms lack them, for example. Unfortunately, you are pretty much out of luck. This is one reason why I don't advocate zooms for scenic/landscape photography. Without these markings you are crippled as a photographer, and the disappearance of lens markings is an ongoing crime against photographic craft. Fortunately, although lens marking standards may have changed, the laws of optics have not. You may be able to get by with a graph, table, or formula that you carry in the field to provide the necessary depth of field information that would have been provided by the missing markings.
One final thing to remember when choosing your aperture harkens back to the beginning of this Photo Tip. I said the depth of field is the range of the image that is in acceptably sharp focus. Whether something is acceptable is a matter of personal opinion. The folks who labeled your lens chose a standard that made sense to them, but it might not satisfy you. I am exacting in my work, and I try to stop down one extra stop beyond what the lens markings would tell me to do, as long as wind conditions permit the corresponding slower shutter speed
Now you can go out and make your photos sing by imposing on them exactly the amount of depth of field that you, the photographer and artist, choose as optimal.
| VISIT THE GALLERY |